|
|
|
Converting Toys - The usefulness of everyday objects
| What's Here: | |||
Some of the most useful terrain, building and especially vehicle conversions come from simple toys. The recent spate of ATLANTIS McDonalds Happy Meal toys yielded up some excellent Victorian Science Fiction vehicle fodder. The line of toys associated with the movie are excellent AS IS, in terms of scale and applicability to VSF Gaming. A few years back, during the debacle that was the movie THE WILD WILD WEST, Burger King released a line of "almost in scale" Wild Wild West kid's meal toys. The giant spider from that set proved to be a recurring favorite with VSF period modellers, and I will provide a link to a picture of it below.
This page will concentrate on Toy Conversion in general, and how it benefits not only VSF gaming but also historical gaming. Some sources will be given at the bottom of the page. Keep in mind that the toy market can be very volatile, and anything associated with a movie will be an artifact within a year of posting it.
PROJECTS (Armored Stagecoach) (Tanker Steam Car) (Professor Challenger's Aeolius ) (The Prussian Strider)
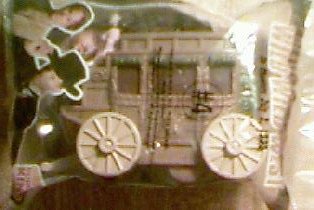
Project 1: Converting the Old Burger King Wild West Stagecoach into a Armored Galvanic War Wagon.
"BEFORE" PICTURE
Comments: It will be difficult to achieve a balance between solving the toy's obvious scale problems and still retaining the classic stagecoach look. My thoughts are to remove the yoke up front (which is useless in a self-powered vehicle anyway) and fill in the resulting hole. Also remove the winder key and fill in. The windows and door are fairly nicely done, but suffer from being too large for 28mm to 33mm figures. My thoughts are that if we are going to hide the scaling problem, the best way might be to cover the windows with armor plating with more 'in scale' viewing slits cut into them. I'd also cover the door, naturally, to scale it down somewhat and cover the movie emblem molded into the cover. There's a nice platform molded into the back of the vehicle, which is meant for 'baggage". This is where I would put the galvanic stuff-- batteries, capacitors, wire....
Step 1: Remove the Guts . Pry out the windup mechanism with a slim flatblade screwdriver. Be careful; the plastic is softer than it looks. SAVE THE BITS! There's a nice pile of gears, cogs, etc. to harvest from this vehicle. In particular, pull out the front mini-wheel that's got an axle sticking in it and save for later. We'll use this
Step 2: Trim Extraneous plastic . Out of the bag, this stagecoach doesn't look remotely authentic. It's too tall, for one thing, and the "yoke" in front is too short to be used. I trimmed the bottom of the coach sides where it slopes out with an exacto, resulting in a coach that looks a lot more like a stagecoach. I also removed the squared off front end (I will replace it with something else later). The back has a nice notch in it for a power source platform, so I leave that alone.
Step 3: Deal with the doors and windows. You can't trim the windows open with a knife, as that will make the model fall apart. So I trimmed some plastic card to fit into the window niches, to resemble armor plate. In the large center window, I cut a vision slit which looks nice. I also added another door to both sides, looking like it was lower side hatch. The smaller doors now make the vehicle much more in scale. I retained the moulded window curtains and filigree as they add a nice 19th century touch
Step 4: Fill in the hole from the windup key. There will be a giant circular hole on the right hand side of the vehicle now. Fill this in with epoxy putty. Do the best you can sculpting the small notch in the wheel rim.
Step 5: Add some details. I put in small microbeads on each hatch cover and on the back of the vehicle to become viewing holes/rifle ports. I will paint these brass. I also added a hatch cover on top of the vehicle, as well as over the hole where the female plastic figure was sitting. A nice "scale detail". Remember that axle and and wheel? It makes a nice vehicle weapon. I glued it directly to the outside of the front of the coach, below where I put the hatch. This will be my galvanic rifle. I also added a Naval Gun from THE LONDON WAR ROOM on top for looks.
Step 6. Add a power source. I glued a platform on the back for the galvanic battery (a ping pong ball). I stuck two terminals in the battery (brass rod) and two bumpy electrical thingies into the transformer (what WAS the green pack on the back of the vehicle. I added round beads to give it that cool Frankenstein capacitor look. I coiled wire around an exacto blade handle and attached it from the terminals to the electrical thingies. Alternatively, you might try a styrofoam thread spool to make into a boiler for a steam vehicle.
Step 7. Do something with the front of the vehicle. It's kind of squared off and not very coachy-like. I added a flat piece of styrene and am looking for an HO scale cow-cather to add to the front for some 19th century panache. I ended up compromising and adding Warhammer Spikey Bits from a Lehman Russ tank.
Step 8. Add rivet details. I use either pieces of baked Sculpy clay squeezed through a clay extruder, or track nail heads, depending on my needs. If you have time and wish to be paintstaking, drill a small hole for each rivet with a pin vise.
Step 9. Prime and Paint. Black base coat, drybrushed with gunmetal throughout. I paint the filligree brass for style, and the little microbead "spyholes" brass as well. Such details as are visible I try to accentuate.
Add some suitable figures, and you're done, son.
KEEP IN MIND: this is MY interpertation of a lightning coach. I'm making this up as I go along; so can you. If your project looks different, that's cool.
"AFTER PICTURE"
This is the Sweetheart of the Rodeo, Galvanic War Wagon of the reconstituted Republic of Texas, after all the conversions:

Another View (side)
And Another-- this one shows off the galvanic rifle nicely (for this camera at least). The galvanic rifle is the axle and flywheel from the original toy, glued to the body, with two beads on the shaft to make it look like a capacitor. Painted brass.
MORE TOY CONVERSIONS
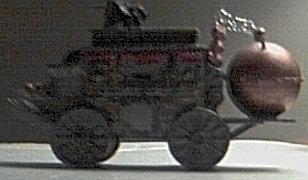
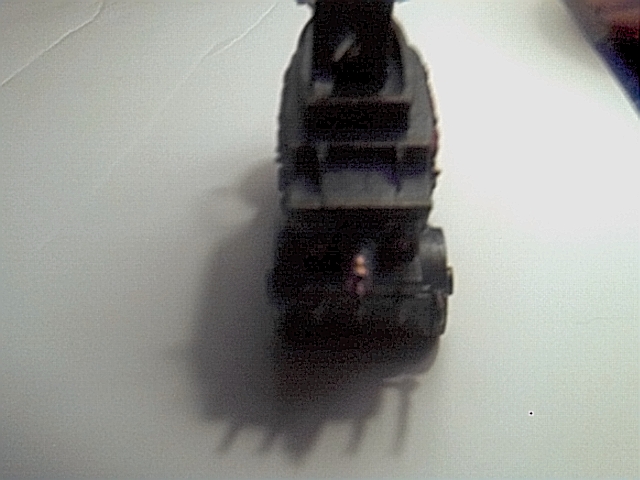
Here is a recent conversion, the giant Atlantis Tanker toy from the McDonald's Happy Meal.
I call her various names-- she's THE VERY SMART APE TEAM in Le Grand Cirque, and the Tender to the Strider contingent in Gaslight.
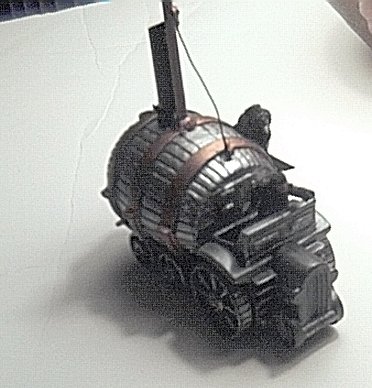
Here's another view:
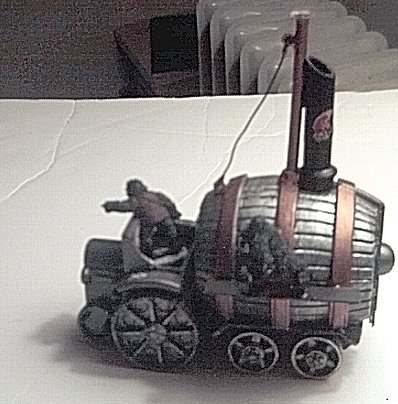
Basically, this vehicle was unaltered from the start. I just glued the two halves (tractor and tanker) together, removing the spring first. I added a stack (black) and watering spout (brass tube), plus little mechanics gangway on the left side. For fun I added Koko, the gorilla mechanic you see on the gangway. I also added a ladder on the back, and a coal shovel for detail. I painted the whole thing gunmetal after priming it, then drybrushed with silver to give it that well-used look. I painted the bands on the boiler a dull brass. Bits here and there are black for contrast. I like this model. The pilot is one of Eureka's new planet of the apes figures. Don't mention Darwin to this crowd, they get pretty upset about it. Koko, in particular, is a bit of an elitist when it comes to her genetic origins.
PROFESSOR CHALLENGER'S WIND BLOWN LAND YACHT
This is another great Atlantis Happy Meal Toy conversion. I waxed whimsical with this one-- creating a sort of magically driven sailing ship that runs on land, piloted by a Supernatural detective (Professor Challenger and his assistant, Monsieur Heavyfoot). I started with the submarine happy meal toy. I call it the Aeolius, after the Greek myth for the West Wind.
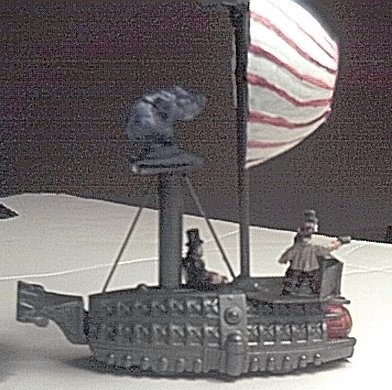
The platform up front is made out of styrene card. The tower for the chained efreet (the blue guy up top) is also styrene tube with a bit of card on top. I like the ribs and details on this toy, which gives it a Victorian look.
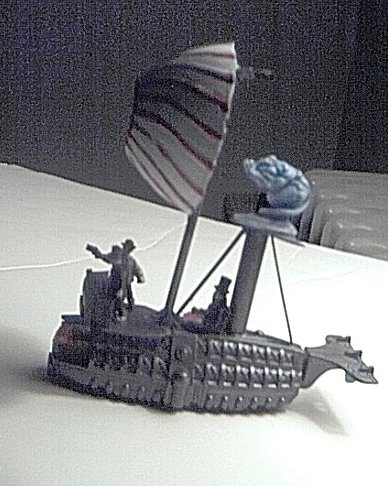
Here you can see the Professor on the helm, plus the chess playing machine next to the tower. The sail is the top of a soda bottle. The Chess playing machine is the little Loveless figure from the "Spider" Burger King Happy Meal toy. Professor Challenger is from the Victorian Gents line (Foundry) and Monsieur Heavyfoot is from the Franco Prussian line (also Foundry). BTW, the front of the toy still glows when you push the tail.
THE PRUSSIAN STRIDER COMPANY
Well, it's only one vehicle so far but I have the makings for at least three more. I use this for GASLIGHT purposes, in my Texas-Prussian campaign.

Basically the vehicle is the bottom of a "Loveless Figure" from the Wild Wild West line, with the top of a deodorant stick as the turret. I affixed some card on the bottom of the turret and glued the actual piece of plastic the Loveless toy rotates on to allow the turret to rotate freely. The gun is a cocktail skewer with a piece of styrene for the end of the barrel. The stack is home built from styrene tube and strips, ditto for the water spout. Rivets are track nail heads. I added some detailing and decals to this model, notably some stairs and a ladder up one of the legs, a hatch cover, a whale oil lamp up top, and a smoke launchers.